Project Attributes
Project Attributes are predefined data fields configured by Project Managers to structure information across a project.
They are used to classify, filter, and standardize project information in different BIMWorkplace workflows, including Topics, Clashes, and CDE Documents.
BIMWorkplace includes default attributes and also allows Project Managers to create custom attributes when project-specific information needs to be tracked.
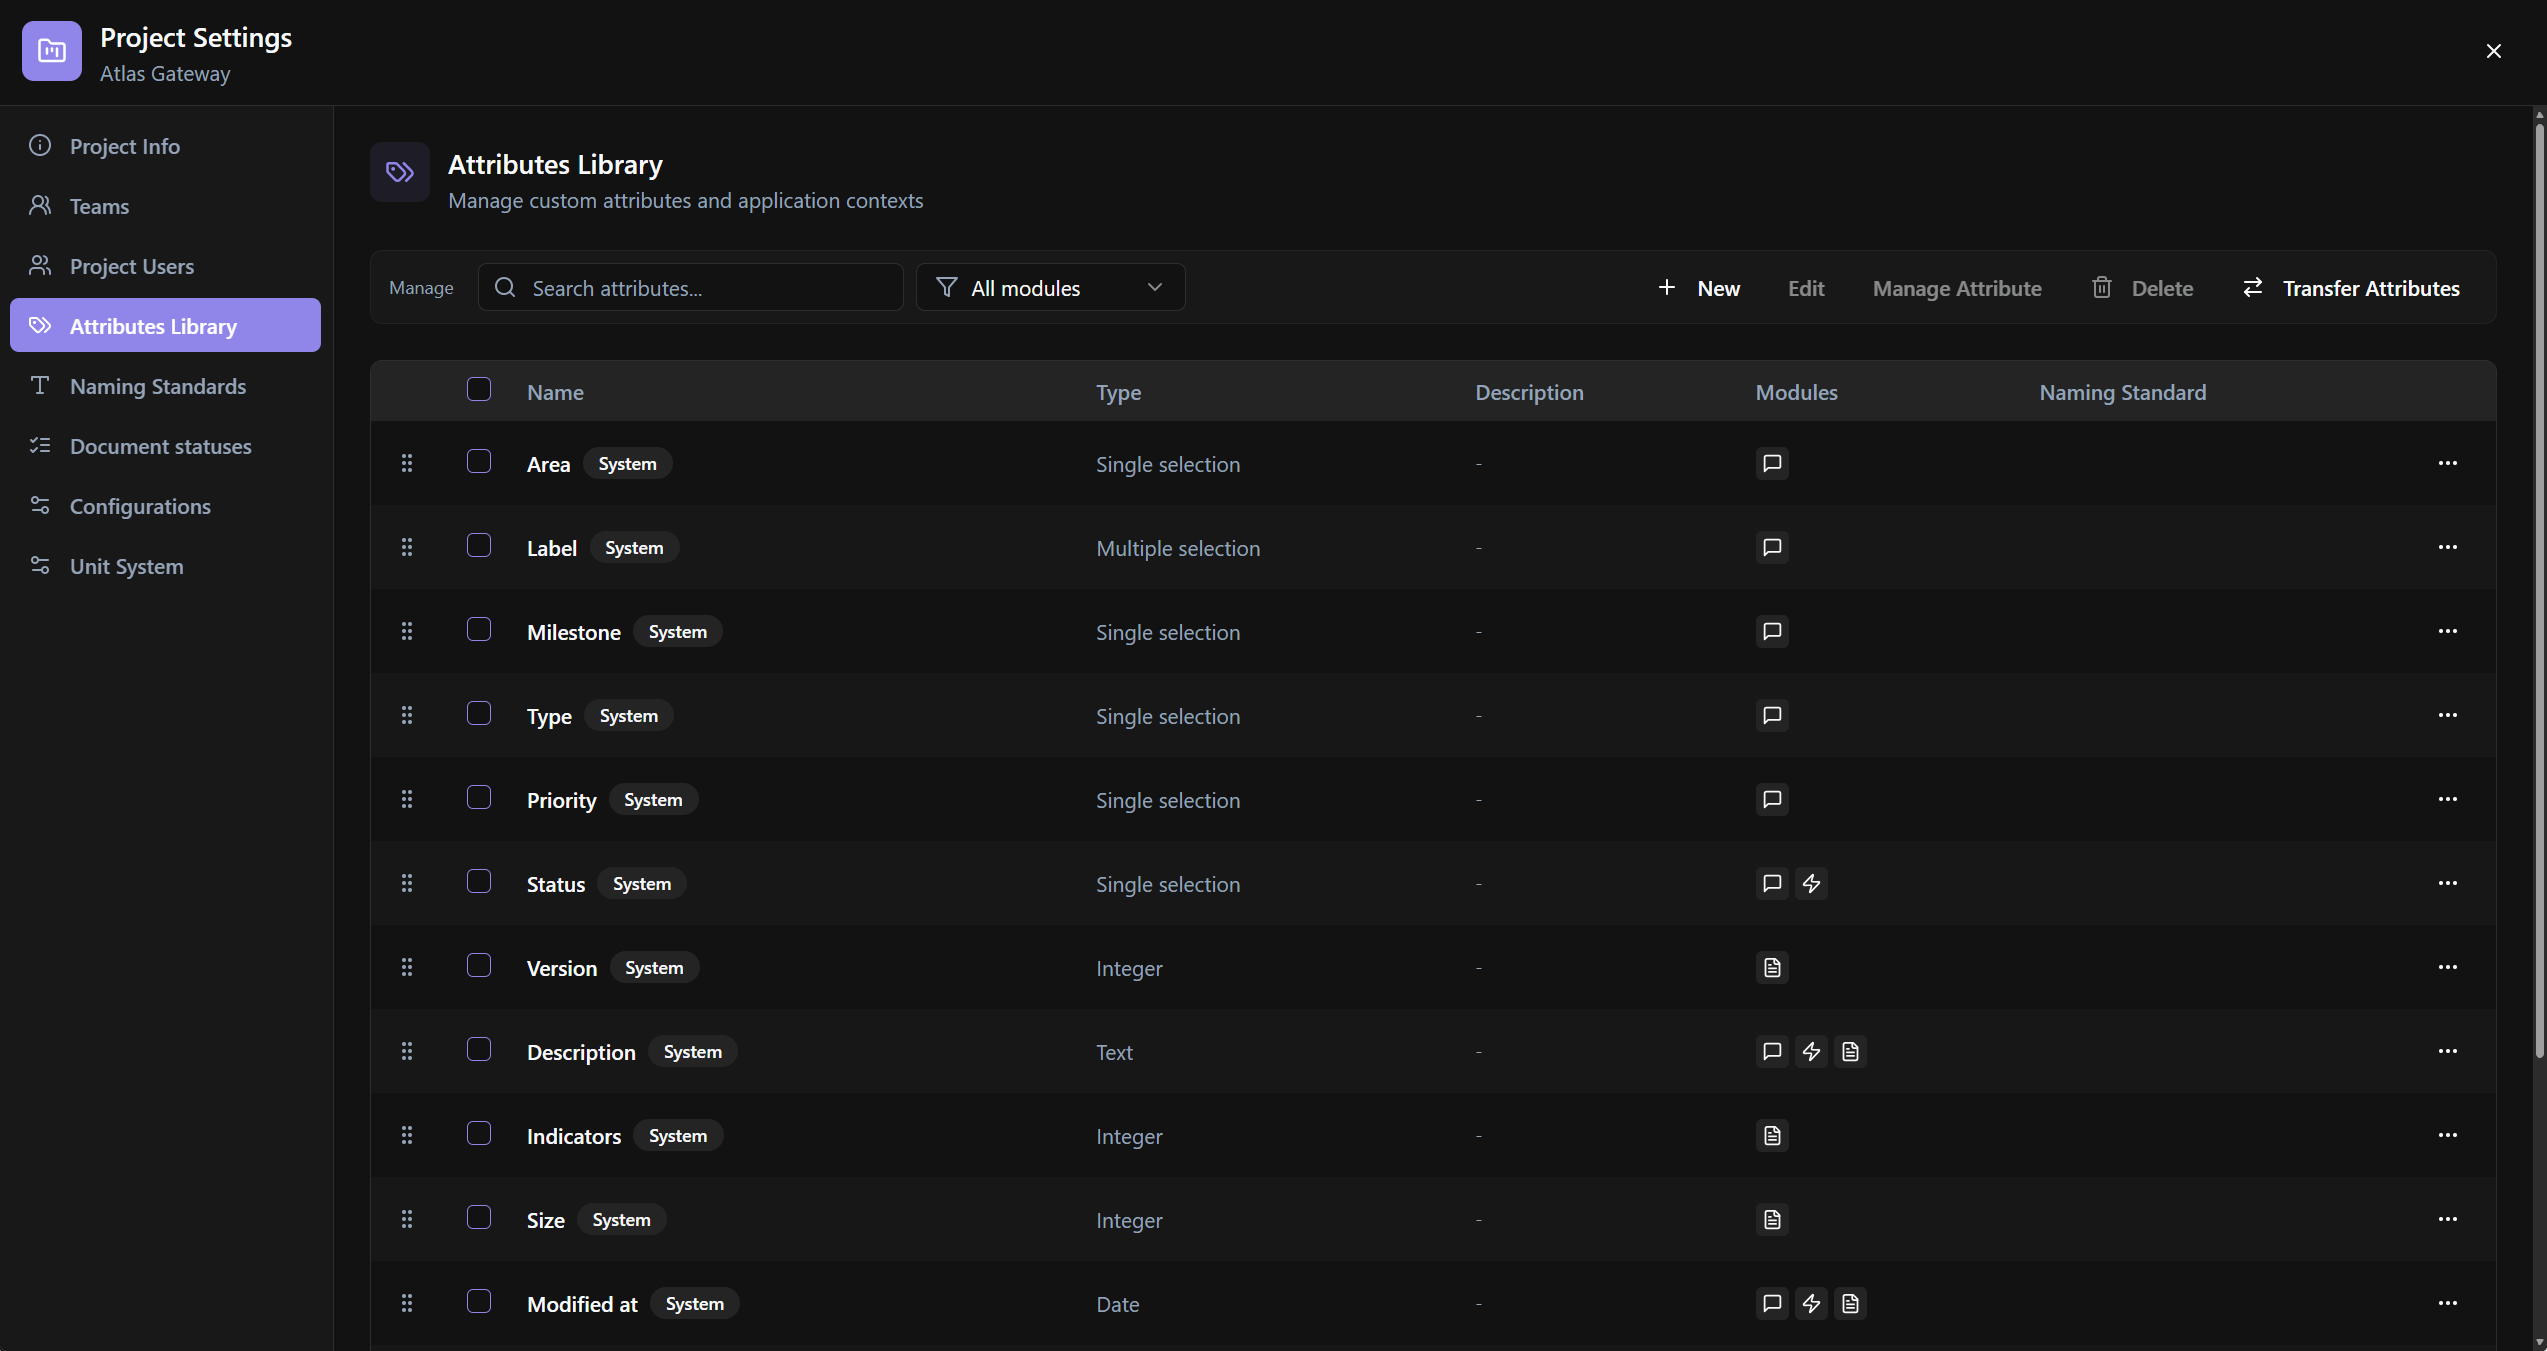
Attributes Library overview
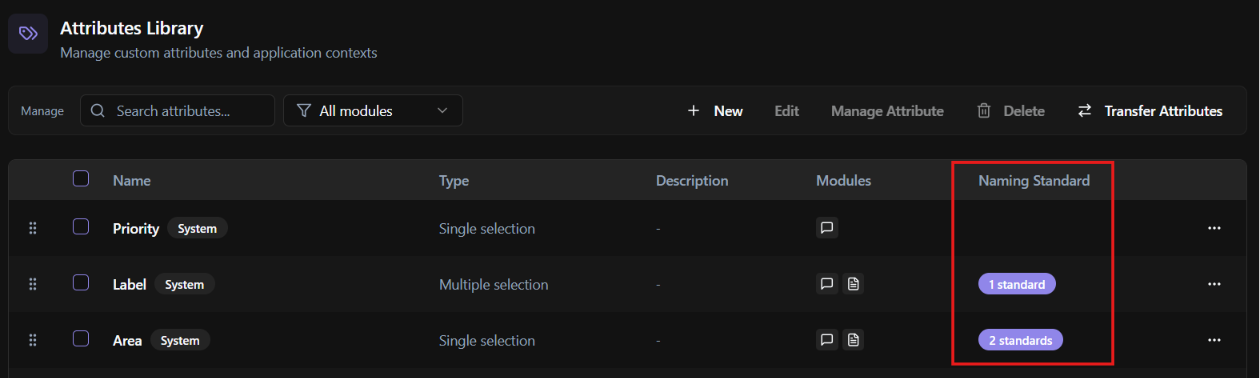
The Attributes Library page lists all attributes available in the project.
From this page, you can search, filter, review where each attribute is being used, and access the main attribute management actions.
The page includes:
· Search bar — use it to search for attributes by name.
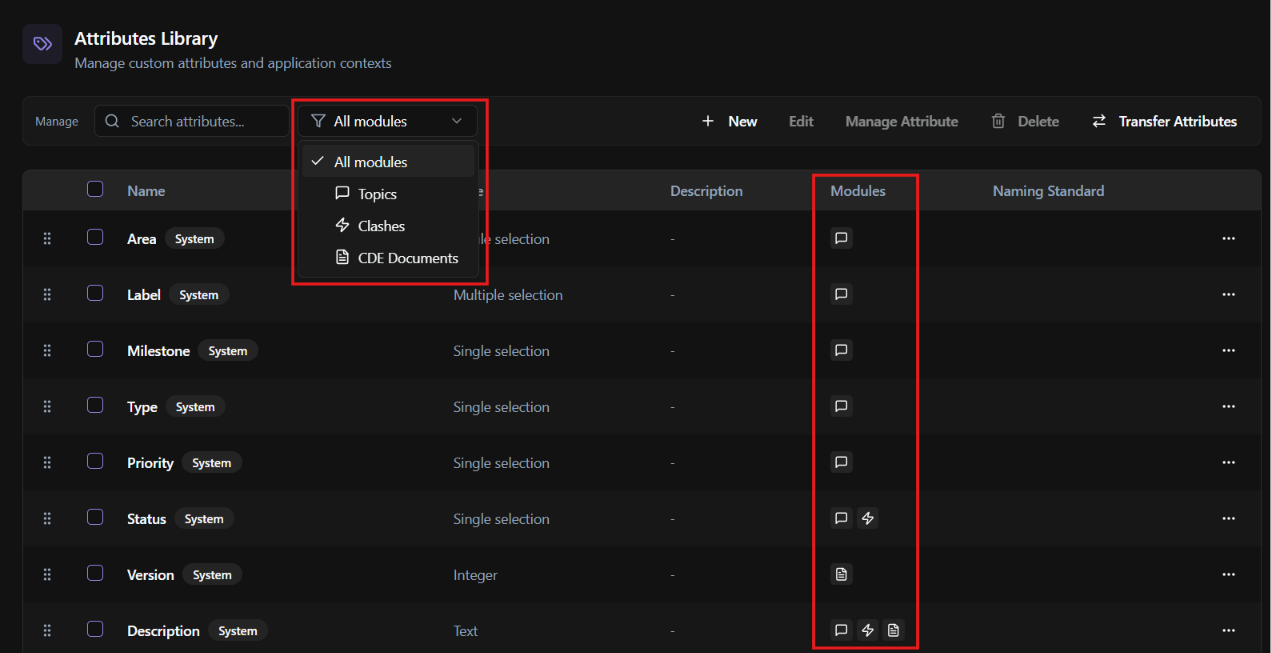
· Module filter — use it to filter attributes according to where they are applied.
· Modules column — shows where each attribute is currently being used.
· System label — identifies default attributes created by BIMWorkplace.
· Actions menu — use the meatball menu to access attribute-specific actions.
The Modules column helps Project Managers quickly understand whether an attribute is being used in Design coordination workflows, CDE document management, etc.
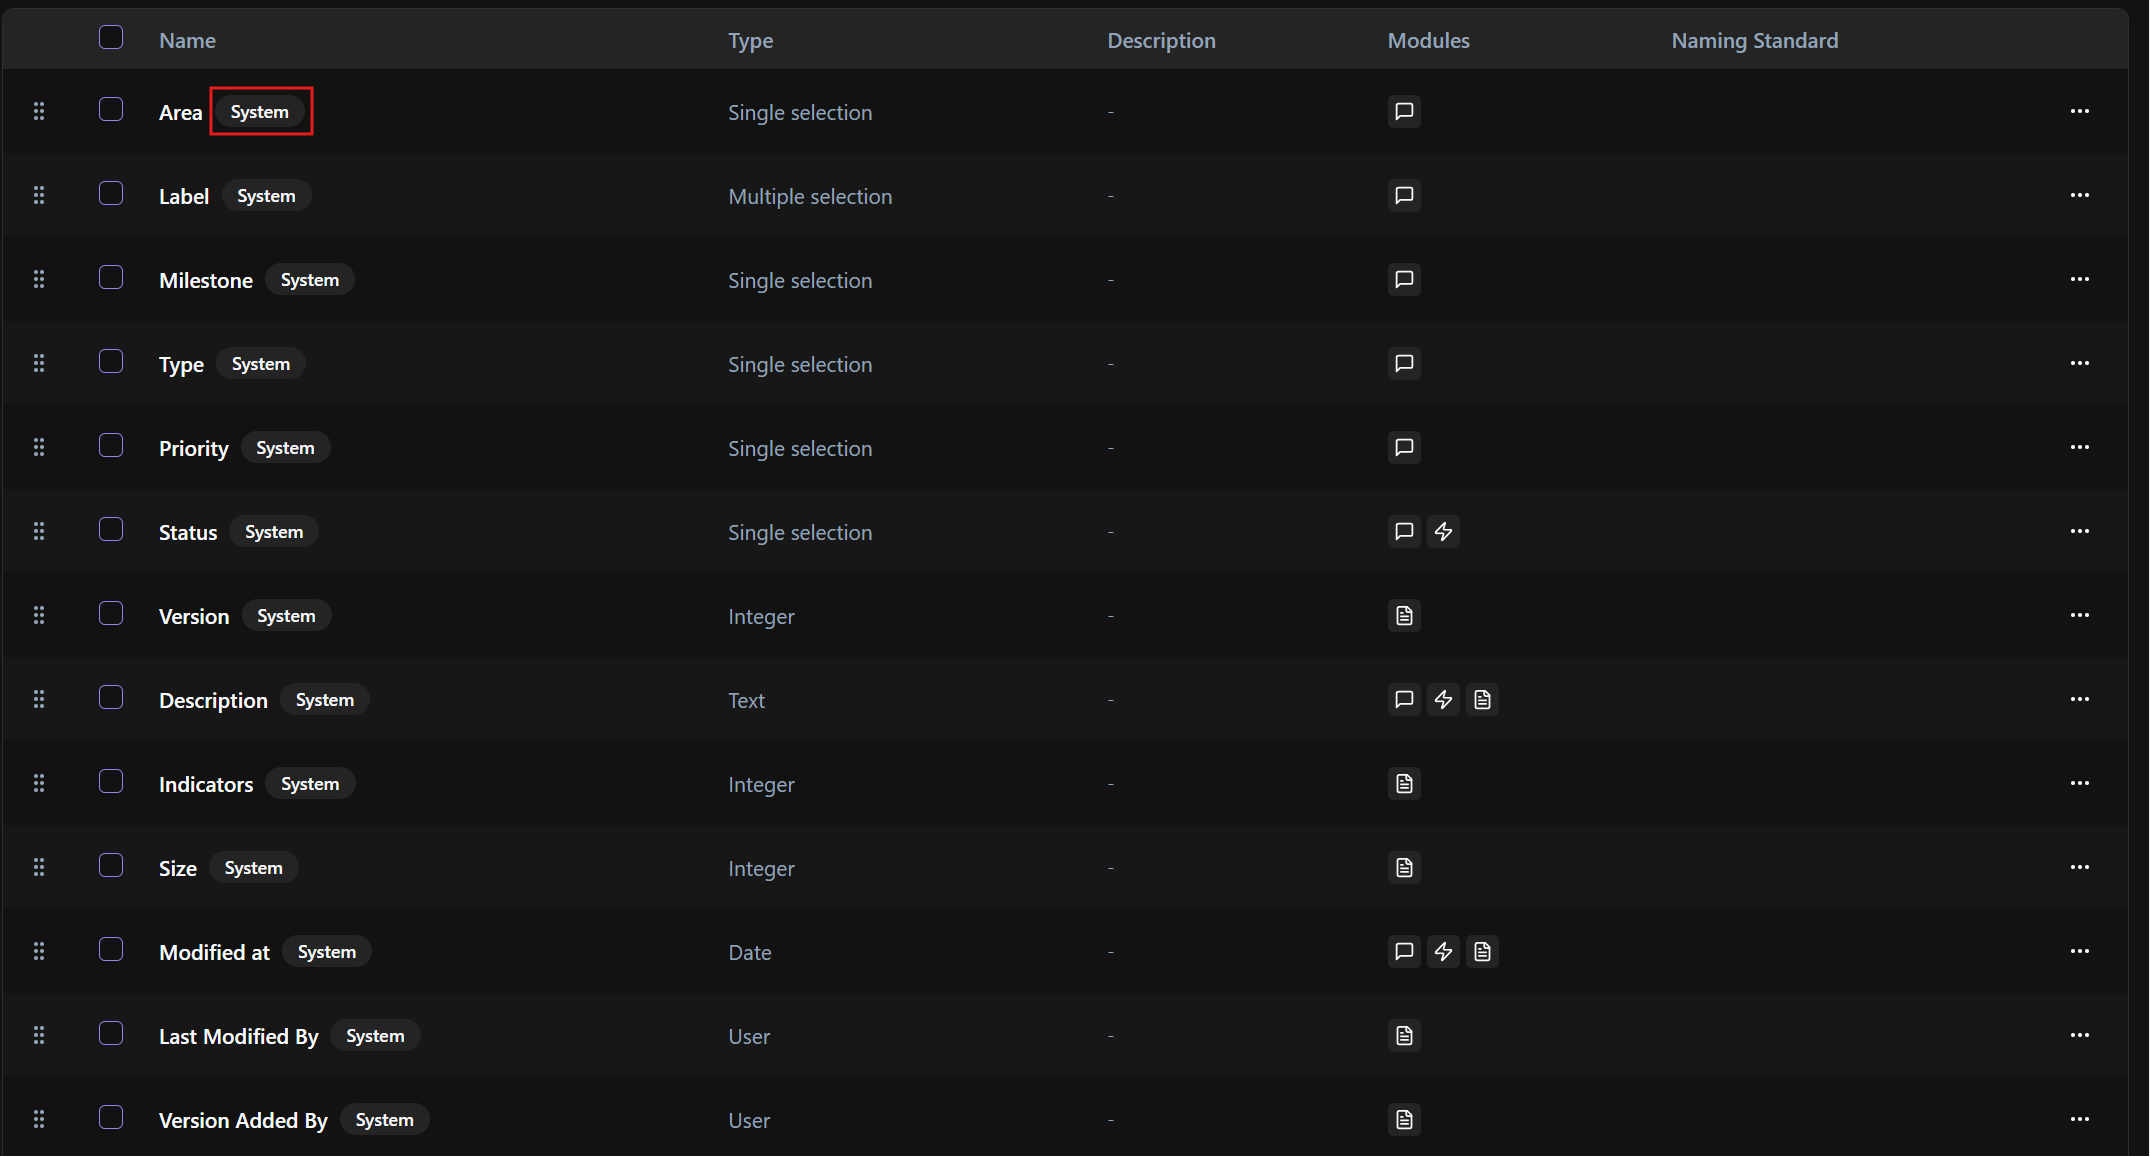
Default attributes
New projects include a set of default attributes.
Default attributes are marked as System in the Attributes Library. This helps distinguish them from custom attributes created by Project Managers.
Default attributes include:
· Area
· Label
· Milestone
· Type
· Priority
· Status
· Version
· Description
· Indicators
· Size
· Modified at
· Last Modified By
· Version Added By
Default attributes cannot be deleted, but their values can be edited when applicable.
New: creating custom attributes
Use New to create a custom attribute.
Custom attributes are useful when the project needs to track information that is not covered by the default attributes.
Examples may include internal review codes, package numbers, approval stages, delivery dates, discipline-specific classifications, or any other project-specific data.

To create a custom attribute:
Click New.
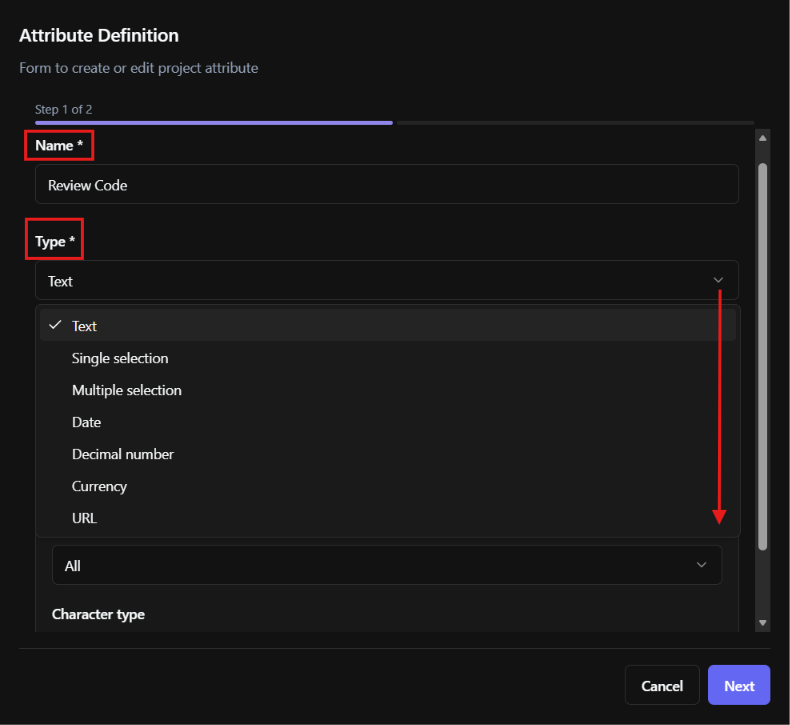
The Attribute Definition panel opens.
Enter the attribute name.
Choose the attribute type.
Configure the attribute according to the selected type.
Click Next.
On the next page, select the module where the attribute should be applied.
Click Save.
The module selection page is the same configuration panel used when clicking Manage Attribute for an existing attribute.
This means you can define the attribute’s module availability during creation, and later update it through Manage Attribute if needed.
Attribute types
When creating a custom attribute, choose the type that best matches the information you want to collect.
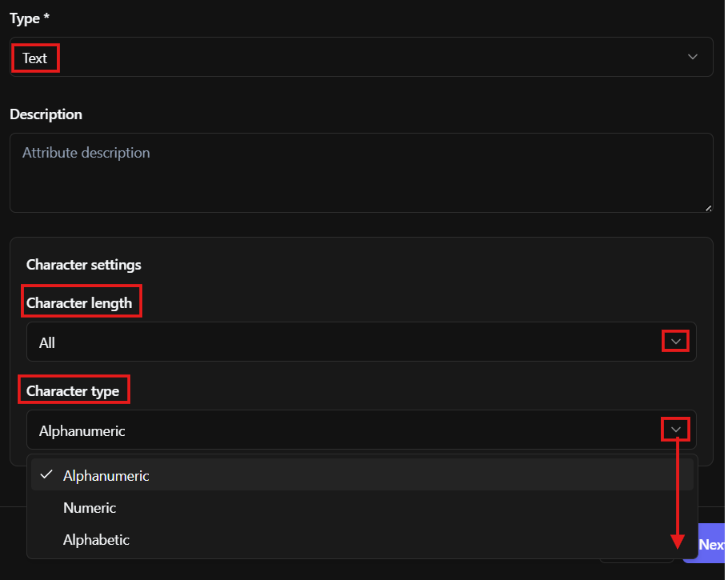
Text
Use Text when the attribute should allow written input.
You can define how the input is controlled, including:
· Unlimited length
· Fixed length
· Character range
· Character type (Alphanumeric, alphabetic, or numeric input)
Use Text attributes for flexible information that may vary between topics, files, or workflows.
Single Selection (Dropdown)
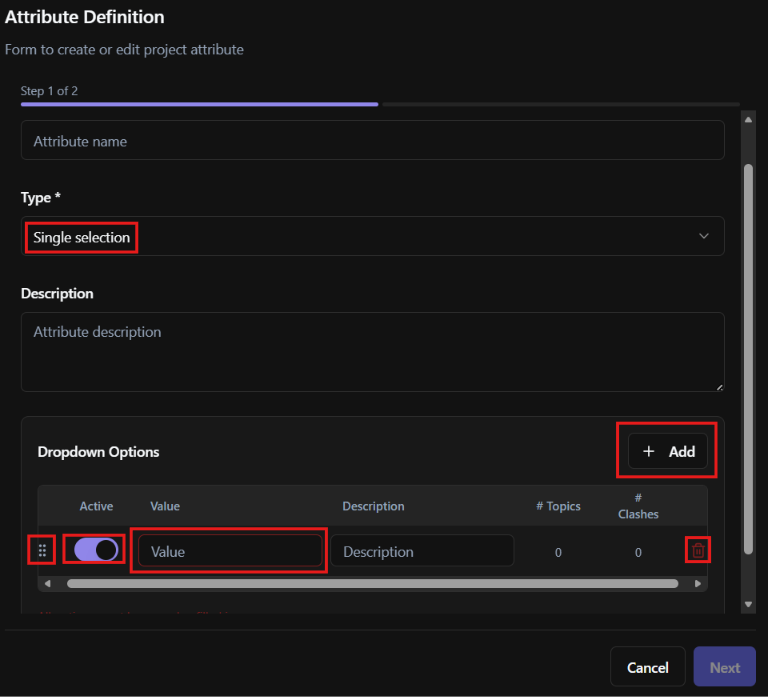
Use Single Selection when users should choose one value from a predefined list.
Create the available values using Add Row.
After creating the values, you can:
· Rename values
· Reorder values
· Activate or deactivate values
This is useful for attributes such as status, priority, discipline, review stage, or any field where only one option should be selected.
Multiple selection
Use Multiple selection when users should be able to choose more than one value from a predefined list.
This is useful for attributes such as labels, related disciplines, responsibility groups, or categories that may overlap.
Adding and editing values works the same way as Single selection. You can add predefined values, rename them, reorder them, and activate or deactivate them.
Date
Use Date when the attribute should store a date.
This is useful for deadlines, submissions, reviews, approvals, milestones, or delivery dates.
Decimal number
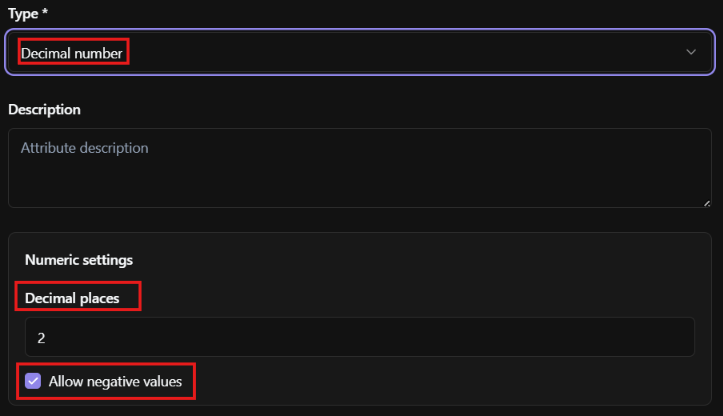
Use Decimal number when the attribute should store a numeric value with decimal places.
This is useful for quantities, measurements, percentages, technical values, or any field that requires numeric precision.
When configuring a Decimal number attribute, you can define:
· Number of decimal places
· Whether negative numbers are allowed
Use the decimal places setting to control the level of precision required for the attribute. Use the negative number option only when values below zero may be valid for the project workflow.
Currency
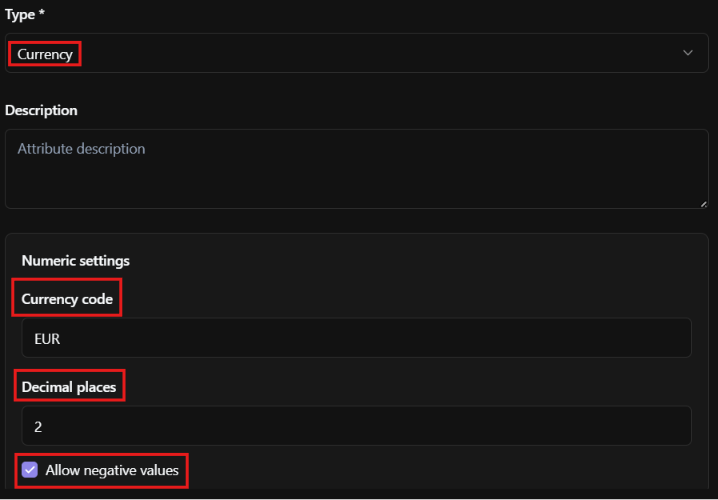
Use Currency when the attribute should store monetary values.
This is useful for budgets, costs, estimates, procurement values, contract values, or financial tracking related to project information.
When configuring a Currency attribute, you can define:
· Currency code
· Number of decimal places
· Whether negative values are allowed
Use the currency code to standardize the monetary unit used in the attribute, such as EUR, BRL, or USD. Use decimal places to control the required level of precision. Allow negative values only when the project workflow may require them, such as adjustments, deductions, or cost variations.
URL
Use URL when the attribute should store a web link.
This is useful for linking to external references, specifications, documents, dashboards, or other online resources.
Important notes about attributes
Once an attribute is created, its attribute type cannot be changed.
If an attribute is used in a Naming Standard, it cannot be edited.
Edit: editing attributes
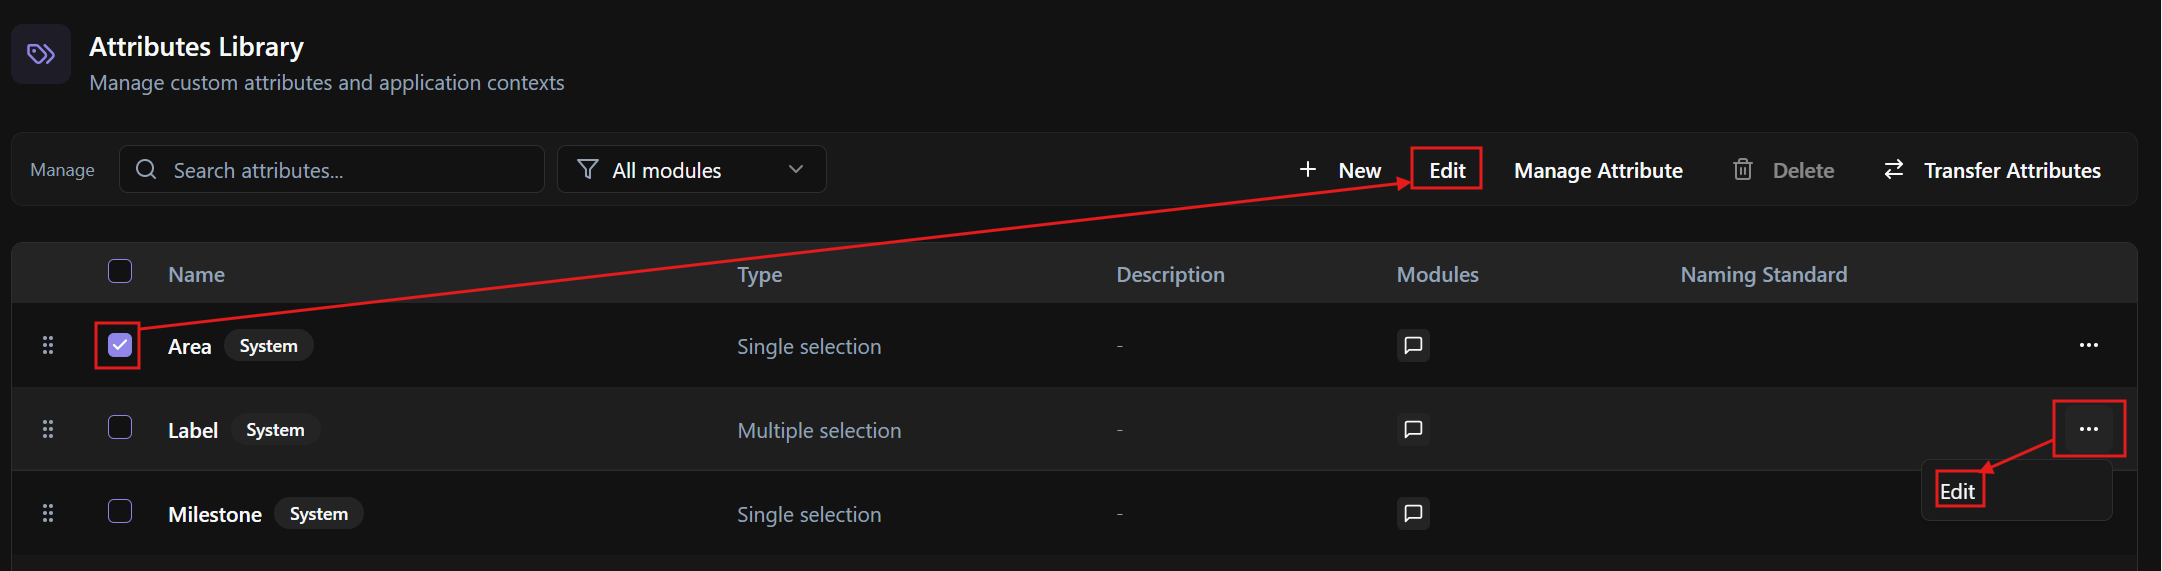
Use Edit to manage specification of free-text attributes or the values of a single or multiple selection attribute.
To edit attribute values:
Go to Project Settings.
Open Attributes Library.
Select the attribute from the list.
Click Edit in the ribbon.
You can also open the edit side panel from the meatball menu of each attribute.
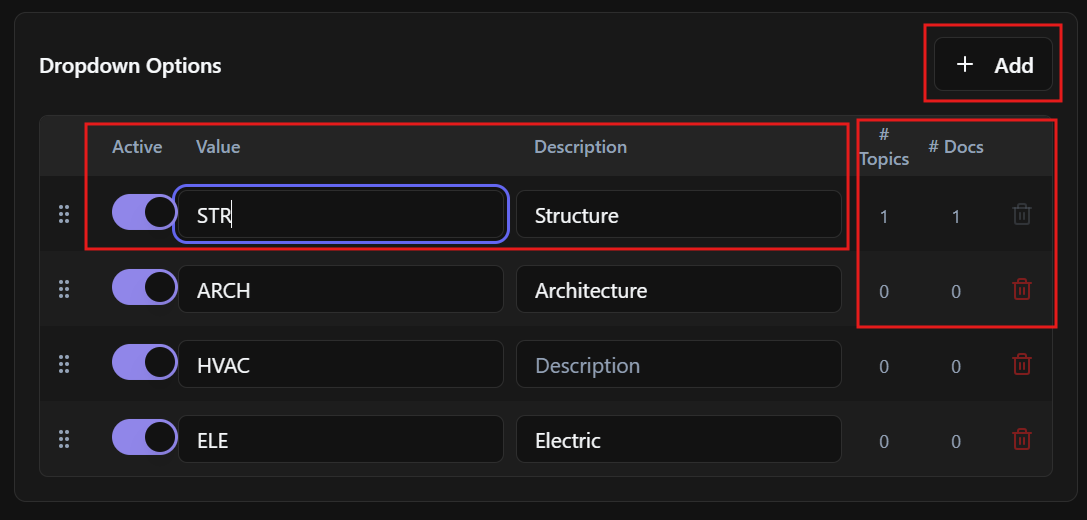
For single or multiple selection attributes, you can:
· Rename a value using the pencil icon
· Add a new value
· Delete a value using the trash icon
· Reorder values by dragging them
· Activate or deactivate values using the Active switch
· View how many topics are using each value in the usage count column, such as # Topics
Attribute values that are already being used in topics or documents cannot be deleted.
Use the usage count column to understand where a value is already in use before trying to delete or modify it.
Click Apply to save the changes.
Manage Attribute: assigning attributes to modules and folders
For an attribute to be visible in BIMWorkplace workflows, it must be assigned to a module.
Use Manage Attribute to define where the selected attribute should be available.

You can also open the manage attributes side panel from the meatball menu of each attribute.

To assign attributes to modules:
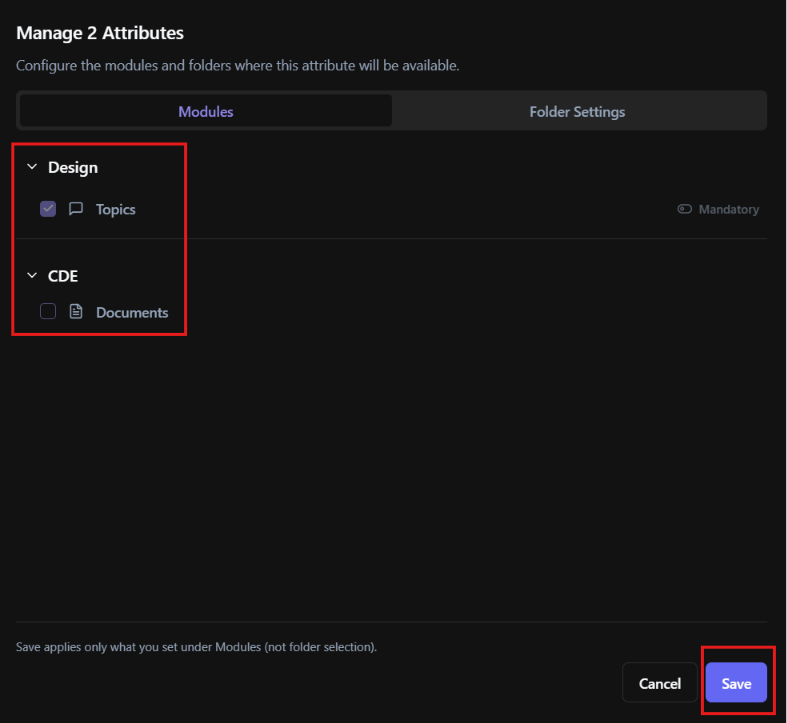
Select one or more attributes.
Click Manage Attribute in the ribbon.
The Manage Attribute panel opens.
Select where the attribute should be available.
Click Save.
Attributes can be assigned to:
· Topics
· Clashes
· CDE Documents
After saving, the Modules column displays the corresponding module icons.
Mandatory attributes for Topics
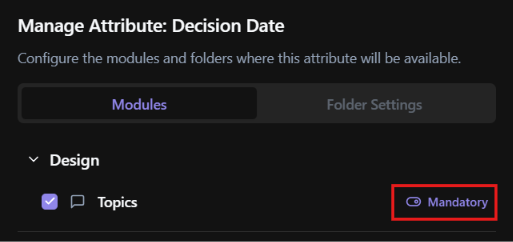
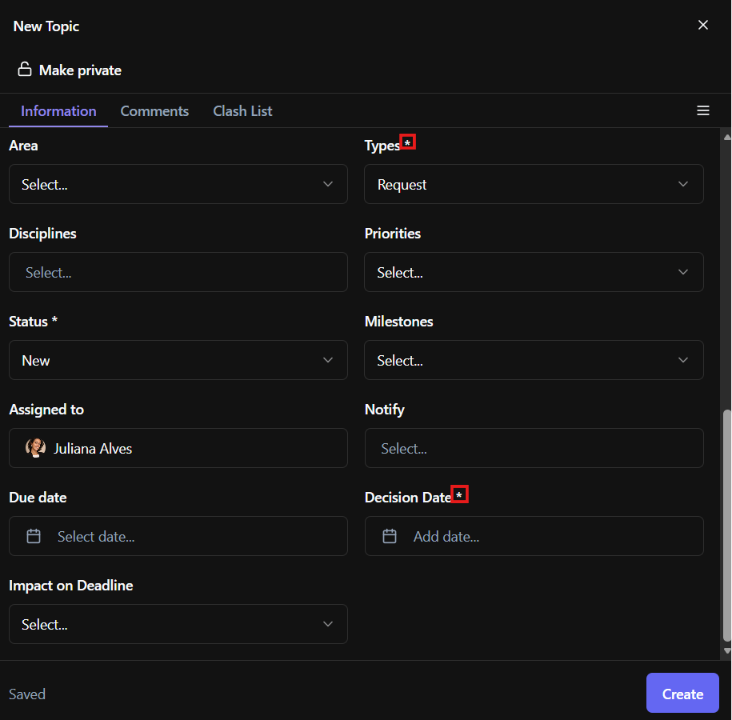
When assigning an attribute to Topics, you can define whether it should be mandatory during topic creation.
If the mandatory switch is enabled, users must complete that attribute before saving a new topic. Mandatory attributes are indicated by * in the topic panel.
Assigning attributes to CDE folders
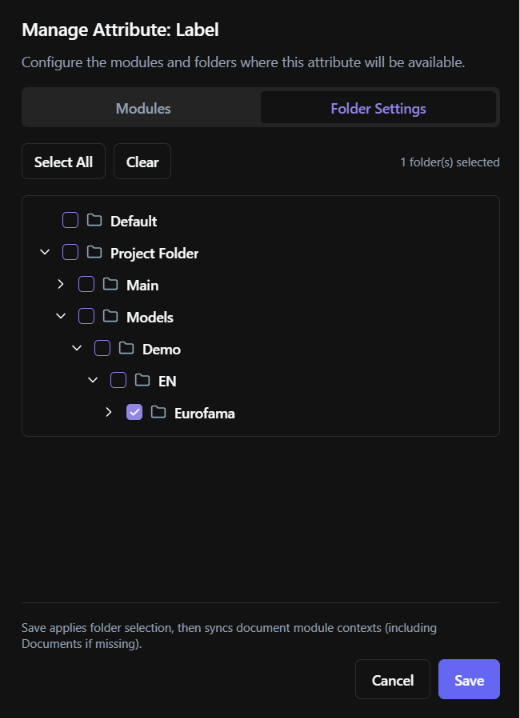
CDE attributes can be assigned to specific folders.
This controls where those attributes appear as file columns and where they can be used for classification, filtering, and Naming Standards.
You can assign attributes to CDE folders in two ways:
· From Project Settings > Attributes Library, using Manage Attribute.
· Directly from the folder configuration inside the CDE.
For folder-based configuration inside the CDE, see Managing CDE Folder Attributes.
To assign attributes to CDE folders from the Attributes Library:
Open Project Settings.
Go to Attributes Library.
Select the attribute.
Click Manage Attribute.
Go to the Folder Settings tab.
Select the target folders.
Click Save.
The folder must already exist in the CDE to be selectable.
Delete: deleting custom attributes
Use Delete to remove custom attributes that are no longer needed.

You can also open delete attributes from the meatball menu of each custom attribute.
System attributes cannot be deleted.
Custom attributes may also have deletion restrictions if they are already being used in project workflows or if they are included in a Naming Standard.
Before deleting an attribute, check where it is being used in the Modules column and verify whether it is part of any Naming Standard.
Transfer Attributes
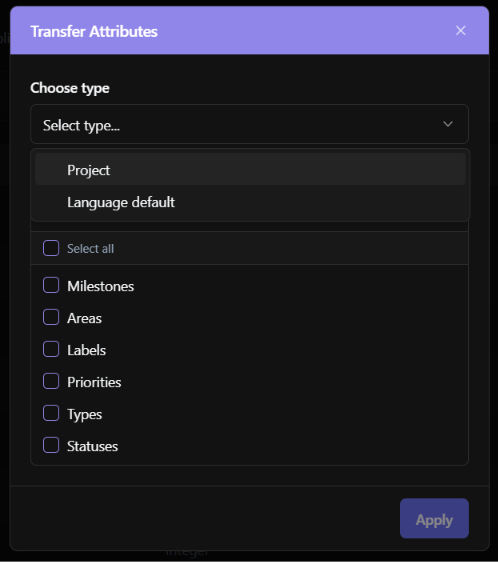
Use Transfer Attributes to reuse attribute configurations instead of recreating them manually.

The Transfer Attributes feature allows Project Managers to:
· Copy attributes from another project within the same Workplace
· Copy default attributes from another language
This is useful when several projects follow the same classification structure or when a project needs to be configured in another language.
Using Project Attributes in Topics
In Topics, assigned attributes appear as fields when creating or editing topics.
These attributes help classify topics, define responsibilities, support filtering, and standardize coordination information.
If an attribute is marked as mandatory, users must complete it before saving the topic.
Using Project Attributes in CDE Documents
In the CDE, attributes assigned to folders appear as file columns.
They can be used to classify files, filter documentation, and support structured document management.
CDE attributes can also be used in Naming Standards to enforce consistent file naming rules.
Was this article helpful?