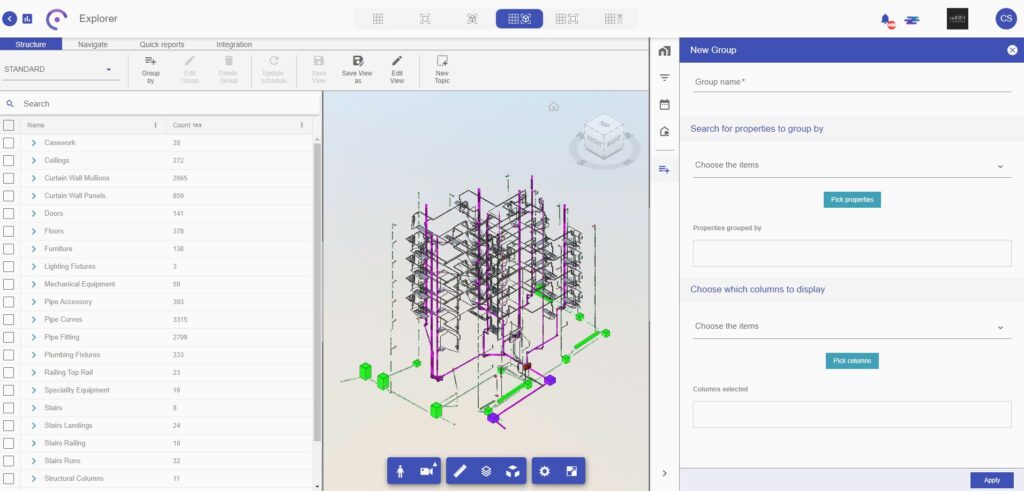
When importing models into BIMWorkplace, the data table structure displays all existing elements in a hierarchical structure by category, family, and type, as well as a column for element count (Standard Structure).
The Group by allows the user to create custom organizational structures based on the desired objective, whether for quantity extraction, planning, data analysis, code filling, etc.
To group the information, follow the steps below:
1 – Click the Group by button and fill in the requested data in the right sidebar.

2 – After assigning a name to the group, select the desired properties from the dropdown menu and organize them in the sequence in which you want the information to be grouped.

3 – Finally, choose the data columns you want to include in the table and arrange them in the ideal order for your workflow.
The added columns with numerical values can have mathematical conditions applied by selecting the desired option (sum, average, highest number, lowest number, and count). Once you have finished customizing the new group, click Apply to complete the creation of the group.

4 – After creating the group, go to the Structure menu and select the group you created from the dropdown menu. To calculate the new data organization structure, click the Update Table button. After calculating the new grouping, the table will display the new structure organized according to what you selected during the group creation.

Note: After calculating the new group, the table will show the new structure organized as selected at creation.
5 – To edit the group, click the Edit Group button in the menu.
6 – To delete the group, click the Delete Group button, also found in the menu, and confirm the removal. If there are saved views with the current group, it will not be possible to delete it without first deleting the associated view.
Now, your team can create tables and handle data in a common and online environment, allowing all team members to interact on the same data.


